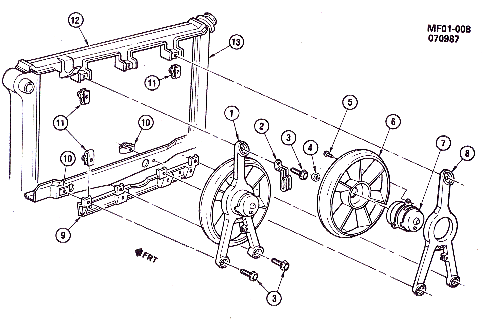
If you are one of the unlucky souls who ended up with a Camaro or Firebird that did not come with dual fans, or if you live in a hot weather part of the country, our vehicle design can cause engine temperatures above normal. The single electric fans just don’t cut it in the summer time. Well here is the solution. The following is a list of diagrams, pictures and parts needed to convert your single fan to a dual fan setup.
Most of these parts can be picked up at a junkyard, but I am listing dealer part numbers and approximate prices just for your information. Some of the best (most expensive) parts to find in a junkyard would be the fan blades and “Y” brackets (called shrouds). The upper and lower fan brackets are usually broken on junkyard cars, but are inexpensive dealer items. The motors can be had at Autozone and usually come with lifetime warranties. You can even reuse your single fan motor if you are on a real budget, as they are the same. Junkyards are also great for finding all those nuts & bolts, as the dealer wants more than they are worth most of the time.
| Diagram Number | Quantity | Description | GM Part Number | Cost (approx) |
| 1, 6 | 2 | Bracket / Shroud | 22073435 | 44.50ea |
| 2 | 2 | Nut | (Included w/ Motor) | |
| 3 | 6 | Self Tapping Bolt | (Included w/ Motor) | |
| 4 | 2 | Fan Blade | 15-8470 | 54.52ea |
| 5 | 2 | Fan Motor | 15-8563 | 90.86ea |
| 7 | 6 | Bolt | 11508269 | 2.05 |
| 8 | 2 | Bolt | 11505023 (use existing) |
|
| 9 | 2 | Line Hangers | (use existing) | |
| 10 | 1 | Lower Fan Mounting Bracket | 10055083 | 7.10 |
| 11 | 2 | U type Nut | 11509582 | |
| 12 | 6 | J Nuts | 11516150 | 1.05 |
| 13 | 1 | Upper Radiator Bracket | 10069174 | 29.14 |
| 14 | 1 | Radiator | (use existing) |
Note: All part numbers are based on a 1990 IROC Camaro Z-28, but will work for any Thirdgen.
Other Parts You Will Need
| Not Pictured | 1 | Fan Motor Connector | Junkyard or Dealer | 15.00 |
| Not Pictured | 1 | Fusible Link | Auto Parts Store | 10.00 |
| Not Pictured | 1 | Relay | Auto Parts Store | 20.00 |
| Not Pictured | 1 | Various Wiring | Auto Parts Store | 5.00 |
Installation Instructions
Existing Equipment Disassembly
- Disconnect Negative side Battery Cable.
- Disconnect wiring harness from existing fan.
- For TPI, remove upper air filter housing.
- For ease of fan assembly removal, partially drain radiator and remove upper radiator hose from the radiator and move out of the way.
Note: This step can be skipped in some circumstances. - With vehicle raised, unbolt the lower fan bracket from body (save bolts)
- Unbolt any AC line brackets from the fan shroud
- Unbolt 4 upper radiator bracket bolts (save bolts)
- Remove fan assembly ensuring that damage is not done to the radiator fins.
Note: You may have to bend/move AC lines out of the way to accomplish this. - You may wish to remove any debris from between the radiator and the air conditioning condenser at this time.
Dual Fan Assembly and Installation
- Attach a fan motor (5) to each of the Y-brackets (1,6) with the supplied self-tapping bolts. Ensure that bolts are not over-tight as the plastic may strip. (refer to diagram for placement)
- Attach fan blades (4) to fan motor shaft with supplied washer/nut assembly. Note: Nuts for motor shaft are left hand thread.
- Attach clips (12) to lower fan bracket (10) as indicated.
- Attach clips (12) to upper radiator bracket. Note: The center hole is not used.
- Align motor/fan assemblies with lower fan mounting bracket with the Y-brackets positioned as shown (see diagram) and attach with bolts (7). Do not tighten at this time.
- Align motor/fan assemblies with Upper radiator bracket (outside holes) and attach with bolts (7). Do not tighten at this time.
- Remove old rubber vibration dampers from the old upper radiator bracket and place into position atop each side of radiator tank.
- Lower dual fan assembly into position and loosely install the 4 upper radiator bracket bolts.
- From under the vehicle, align the lower fan bracket with the holes in the body and fasten using the bolts removed in step 5 of the old fan removal. Tighten lower fan bracket to Y-Bracket bolts at this time.
- Tighten upper radiator bracket bolts ensuring that the rubber dampers are positioned correctly.
- Any AC hoses and brackets may be re-positioned and re-installed at this time by removing the corresponding upper Y-Bracket bolts, aligning the bracket, and replacing the bolt. Tighten Y-Bracket to upper radiator bracket bolts at this time.
Fan Wiring
- Using existing wiring, connect the old fan harness to the driver side motor (primary fan). Reposition wiring retaining clips as necessary and clip to right side leg of Y-Bracket. Note: It may be necessary to lengthen the harness, but most likely will be long enough.
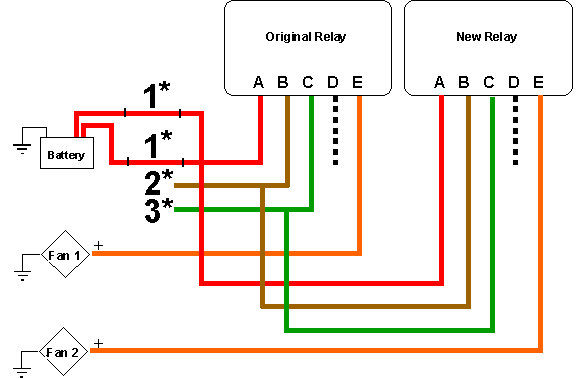
- For passenger side fan you will need to fabricate your own harness from the connector, wiring, relay, and fusible link listed above. See Below
- The Secondary fan can be wired to operate in different ways. My preferred method is D.
a) activated by computer (wire to existing computer ground)
b) activated manually (wired ground switch)
c) activated by thermo snap switch or AC activation (OEM method)
d) combination of two or all three methods
*1: Fusible Link
*2: Brown/White to harness (12v switched)
*3: Green/White to harness (ECM circuit ground and/or manual ground switch)Note: For Aftermarket Relays, refer to it’s instructions for correct terminal wiring
ATGO is not responsible for any damage done to your vehicle by following the above instructions.


