
By: BigBabyLou
Chapter I: Collecting all the parts you need
Make sure you obtain all the necessary parts for this swap, otherwise you might be stuck for weeks looking for a missing part.
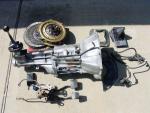
List of parts you do need:
- T-5
- correct bellhousing
- flywheel
- clutch, pilot bushing, throwout bearing, clutch fork, alignment tool
- pedal assembly
- hydraulic system (master, reservoir w/bracket, line, slave, slave rod, slave shield)
- transmission bushing
- the T-5 specific torque arm mount clamshell w/bushing
- flywheel inspection cover
- shifter w/shifter boot and plate
- bolts
- reverse gear switch connector (2-prong, 2-circle shape)
- clutch starting safety switch connector (2-prong, rectangular shape)
Myth: Gas pedal is part of the pedal assembly and has to be replaced as well.
Truth: No. Gas pedal is separate from the brake/clutch pedal assembly and can remain in the vehicle during the swap.
Myth: The installation requires a special T-5 transmission crossmember.
Truth: No. The manual and automatic transmission crossmembers are identical.
Myth: The T-5 requires a different torque arm.
Truth: No. The torque arm is identical. But you will need a T-5 specific torque arm mount.
Myth: The T-5 pedals require special bolts.
Truth: No. All pedals are held in place by four studs from the brake booster and four nuts.
Myth: The transmission is heavy and requires the help of several people to install.
Truth: Not necessarily. An average person can install the transmission on their own. If you haven’t done it before, though, I’d recommend some help.
List of tools needed:
- floorjack (two is better to maneuver the transmission around)
- special Torx bits for the bellhousing bolts
- drill
- jigsaw, sawzall or hacksaw
- grinder
- tape measure and some calipers
- and of course a lot of assorted sockets (incl. deep), wrenches, screwdrivers and other regular tools
Chapter II: Preparations
It’s a good practice to check all the bolts and label them ahead of time to avoid any confusion at the installation time.
The follwing is a nearly complete list of all bolts/nuts that you will work with during the installation:
- bellhousing to engine bolts (6x)
- flywheel cover bolts (2x-4x)
- transmission to bellhousing bolts – Torx (4x)
- flywheel bolts (6x)
- pressure plate bolts (6x)
- transmission mount to transmission bolts (2x)
- transmission mount to crossmember bolts (1x)
- transmission crossmember bolts (3x-4x)
- torque arm mount clamshell bolt (1x)
- torque arm mount to transmisstion bolts w/nuts (2x)
- slave cylinder to bellhousing bolts (2x)
- master cylinder U-bracket (1x) w/ nuts (2x)
- master cylinder reservoir to bracket screws (2x)
I would strongly advise to drain the T-5 before you do anything with it. Unless you like swallowing a lot of transmission fluid.
Also, a good thing to do is to remove the current transmission if you haven’t done so yet. For that, you would first need to remove the driveshaft and if you want more room to work with, you can also remove the torque arm (it’s just two extra bolts anyway).
Chapter III: First steps
Remove the automatic shifter if you haven’t done so yet. Leave the electrical connector, do NOT cut it. Remove the lightbulb from the shifter illumination socket, you won’t be needing it. You might want to tape off the socket.
Measure well where the shifter hole needs to be cut. A good way is to look at the T-5 and measure the distance from the front of the bellhousing to the shifter.
Cut the hole and grind down any sharp edges. If your car has a stock bracket for the automatic shifter, grind it down too.
Chapter IV: Clutch
Next step would be to install the flywheel and clutch.
Install the pilot bushing in the crank.
The flywheel is indexed with a dowel pin and held in place by 6 bolts. If you haven’t removed the starter for this procedure, don’t forget to slip the flywheel cover on the starter before you install the flywheel!!
It is not recommended to use an impact wrench to tighten the flywheel bolts. You will need to block the flywheel to prevent it from spinning while you torque the bolts down.
Slip the clutch alignment tool into the clutch disk. Put the clutch disk in the pressure plate and lightly attach the pressure plate to the flywheel with two or three bolts. Just catch a thread or two on each bolt to keep the pressure plate in place, do not tighten at this point.
Push the clutch alignment tool all the way into the pilot bushing. Install the rest of the bolts and start tightening them down evenly. Don’t drive them all the way in at once. The pressure plate needs to be tightened down evenly.
Chapter V: T-5
Remove the shifter from the transmission. Remove the bellhousing from the T-5. Lubricate the clutch fork pivot point and install the throwout bearing in the clutch fork. Remove the alignment tool if it’s still in the clutch disk. Install the bellhousing. Tighten down all 6 bellhousing bolts.
Attach the flywheel inspection cover.
Feel free to doublecheck the measurement on the shifter cutout.
Now is the time to wrestle in the transmission. Make sure it’s in neutral. Lift it with a jack (or two) and try to match the angle of the transmission input shaft to the angle of the engine. Adjust height of transmission and try to push the shaft through the throwout bearing into the clutch and pilot bushing.
If the transmission does not want to go in, try to wiggle it a little sideways and/or twisting it (to align the shaft splines to the clutch disk splines).
If you’re lucky, the transmission will go all the way in but it usually doesn’t. Angle adjustments might be necessary to push it all the way into the pilot pushing.
If you have maybe 1/2″ left and the transmission won’t go any further, you can insert the four bolts and slowly and carefully snug it up while tightening them down. Be careful. If you feel resistance, it’s probably not aligned perfectly.
Raise the transmission slowly and check the shifter hole. Adjust if necessary.
At this point, you are ready to put the crossmember in and reinstall the torque arm and driveshaft.
Reconnect the mechanical speedometer cable or VSS wires.
Do not lower the vehicle yet.
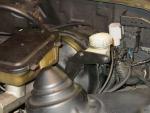
Chapter VI: Pedals and Hydraulics
In the engine compartment, remove the two nuts that hold the brake master cylinder to the vacuum booster and pull the master cylinder away from the booster.
Under the dash, disconnect the brake booster rod from the brake pedal. Remove the four nuts holding the brake pedal to the firewall. Disconnect the brake switch and cruise control switch and remove the pedal from the vehicle. In the engine compartment again, remove the vacuum booster. This gives you room to install the clutch master cylinder.
Now comes the hard part. Under the dash, mate up the new pedals to the holes in the firewall and measure where you need to cut and drill for the clutch master cylinder.
Once the holes are drilled and cut, take the whole hydraulic assembly, lower the slave cylinder from the engine compartment down towards the transmission and install the clutch master cylinder on the firewall. Attach it with the U-shaped bracket.
I strongly recommend that you use big washers under the nuts that hold the master cylinder from the inside. If you don’t, you might push the master cylinder right through the firewall one day. Don’t ask how I know.
From under the dash again, mate up the new pedals with the four holes in the firewall to check if the master cylinder rod eyelet is in the right place to slip onto the clutch pedal pivot pin.
Adjust master cylinder on the firewall if necessary.
Under the car, slide the slave cylinder into the hole in bellhousing and slip the cover over it. Bolt the slave down (the nuts are part of the shield), making sure the slave cylinder rod is centered in the clutch fork.
Make sure the hydraulic line is free of kinks and away from heat (headers) and moving components (steering shaft).
Reinstall the brake vacuum booster in the four holes in the firewall. From under the dash, position the new pedals onto these four studs and reinstall the 4 locknuts.
Attach the clutch master cylinder rod eyelet to the clutch pedal pivot pin and secure in place with an E-clip. Reattach the brake master cylinder rod eyelet to the brake pedal pivot pin and secure in place with an E-clip. Reinstall the brake switch and vacuum switch.
In the engine compartment, slide the brake master cylinder back onto the brake booster studs. Before securing it with nuts, position the clutch master cylinder reservoir bracket onto one of the studs. Tighten the nuts.
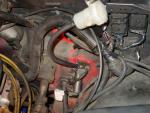
Chapter VII: Wiring and PROM
The T-5 transmission does not require much wiring.
Tape off the 4-prong connector that used to be connected to the automatic transmission. That one is not needed at all.
Now you will need to cut 4 wires out of the automatic shifter connector.
Cut the blue and green wires and attach them to the reverse switch connector. Pull the wires through the big round rubber grommet in the floor tunnel just in front of the shifter. Connect to the transmission (driver side). Cut the yellow and purple wires. Extend them and attach the clutch starting safety switch connector. Route the wires under the dash to the top of the pedal assembly. Connect to the clutch starter safety switch.
Although the car will run fine with the stock automatic chip, it is good to reburn the PROM to delete all the provision for the automatic transmission:
- zero out the IAC Step Offset vs Speed adjustment table
- turn off the Automatic flag in the features table
Chapter VIII: Shifter
Pour transmission fluid down the shifter hole. Slowly, very slowly. The passages are small, you don’t want to spill. Install the shifter. Install shifter plate on the center console. Screw on the shifter knob.
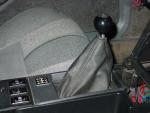
If you feel that the shifter is too long, like you’re rowing gears in a truck, feel free to shorten the shifter stick.
Remove the shifter knob and plate. Unbolt the shifter from the joint.
Cut it to desired length. Grind the top end down to circular shape. Cut threads on the top end for the shifter knob.
Reattach shifter to the joint, install shifter plate and put the knob on.
If the shifter still feels too long or wide, repeat the procedure.
ATGO is not responsible for any damage done to your vehicle by following the above instructions.